
This is non-commercial site, its content is based on Atari 8-bit home computer contents and references.
If you feel your rights are violated by showing/using any part of contents of your product represented on this page,
please contact me immediatelly so I can remove it!

Atari 8-bit Hardware
|
|
|
|
-
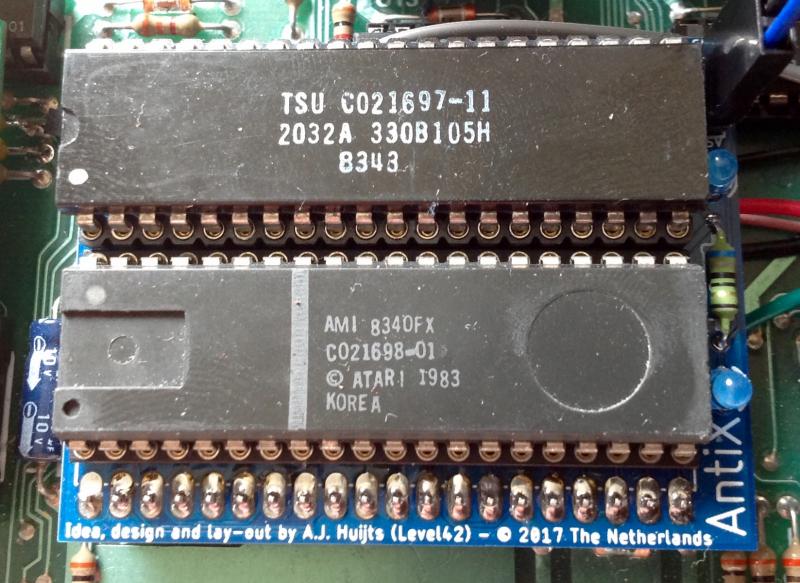
Entry name:AntiX
-
Category:Graphics add-ons
-
Manufacturer:ABBUC e.V., ABBUC Hardware Contest 2018
-
Year:2018
Short description
AntiX summary AntiX is a small PCB that gives you the ability to have both PAL ANTIC and NTSC ANTIC chips inside your Atari 8-bit computer at the same time, and the option to switch between the two. Why was AntiX developed? In the past, people have installed NTSC ANTIC chips in PAL machines and vice-versa to build a Ä‚Ë€œhybridÄ‚Ë€ machine. The main disadvantage of doing this is that it is a permanent solution, and you would need two machines to have the Ä‚Ë€œbest of both worldsÄ‚Ë€. AntiX gives you the option to switch between two ANTICs in one machine. Just like when putting the Ä‚Ë€œotherÄ‚Ë€ system ANTIC permanently in your machine, It does not create a 100% correct signal of that Ä‚Ë€œother", but it provides many advantages at a low cost. In other words, AntiX will yield exactly the same output signal as permanently swapping the ANTIC chip but now with the advantage of being able to go back to your factory set-up. Why should I install AntiX? AntiX provides advantages for both PAL and NTSC territory users. PAL territory users benefit from three important things: 1) Speed: Finally it is possible to play older games at the speed and timing they were designed for. It is not so fast that it feels like the games are in Ä‚Ë€œturbo modeÄ‚Ë€, but the difference in speed between PAL and NTSC is appreciable. Games like Donkey Kong, Ms. Pac Man etc. just Ä‚Ë€œfeelÄ‚Ë€ smoother, and that adds so much playability to these games. 2) Correct aspect ratio: The PAL screen is always Ä‚Ë€œsquashedÄ‚Ë€ because the PAL standard uses more TV scan lines. Not any more! With AntiX switched to the NTSC ANTIC you will see the originally intended aspect ratio which will use all available vertical space to fill your TV/monitor screen. 3) 60Hz frame rate: The AntiX output increases the frame rate from 50Hz to 60Hz (PAL 60). This results in a more stable, clearer picture on CRTs. The chief advantage is that there is much less Ä‚Ë€œflickerÄ‚Ë€. This is kinder to your eyes, and could result in fewer headaches! The big advantage for NTSC users will be the ability to run the more recent demos and games that were developed specifically for PAL machines. Many games from the later era that were developed in PAL territory will yield errors on the screen, often making games unplayable and demoÄ‚Ë€â„Ës look wrong. And with AntiX they still have the ability to switch back to the original NTSC configuration at will. NTSC territory users please note: AntiX does not create a normal NTSC signal. A GOOD monitor or TV is required to get color pictures from the PAL ANTIC mode through the original composite or S-video outputs. This requires a TV that can handle PAL-M (pretty rare), or you can use a professional grade CRT monitor like the Sony PVM series. This limitation is exactly the same when doing a permanent swap of ANTIC. How does AntiX work? In simple terms there is a chip on AntiX that switches approximately 10 signals, and that chip is controlled by the included switch. To simplify this further, the AntiX is Ä‚Ë€œremote controllingÄ‚Ë€ a large number of switches at the same time, from ANTIC 1 to ANTIC 2 and back again. There are also 2 extra switches in the chip which keep the non-active ANTIC asleep, and control the two LEDs on the PCB. How to use AntiX? You should normally only switch between ANTICs when your Atari is powered off. Switching between ANTICs when the Atari is running will crash the system 99,9% of the time because the switching moment is not synced to the Atari. However you can NOT damage your Atari should you (accidentally) switch while power is on. The chip used on ANTIC is designed so that there is never a moment where both signals are connected, it is always either the signals of ANTIC 1 OR ANTIC2. I have tested this countless times to make sure no damage can be done by AntiX. AntiX and Sophia. The best application of AntiX is to partner AntiX with the Sophia video modification. Sophia will offer you an RGB, YPbPr (component) or DVI connection to a (CRT) monitor or TV. All of these signals are free of any PAL or NTSC encoding, which makes it much easier to connect it to any device capable of displaying these signals and get perfect quality color pictures. Combined with AntiX you can then choose between the NTSC and PAL ANTIC and get the benefits of either setting mentioned above. Installing both AntiX and Sophia in your machine is a particularly good choice if your machine is originally a NTSC machine. It avoids the need of having a PAL-M capable TV/monitor to handle the native signal that is output by AntiX from an NTSC machine in the Ä‚Ë€œPAL" setting. Sophia Ä‚Ë€œremoves" the PAL/NTSC encoding, and AntiX will still offer the benefits as mentioned above. PAL territory users also benefit from installing both AntiX and Sophia together; a Philips CM8833/Commodore 1084 monitor f.i. can then be used to connect via RGB and STILL play at NTSC speed in color icon_smile.gif (the mentioned monitors are not capable of displaying NTSC signals in color using composite or S-video). However, PAL territory Atari 8-bit users do not face the same output issues as NTSC users because almost all modern TVs (circa mid-90s and newer) will display the PAL-60 signal natively. This means you can use the composite video or S-video outputs from a standard Atari 8-bit using AntiX only. However, Sophia improves picture quality so much that it is still a good idea to get one, you will not believe what you see. How to install AntiX AntiX is completely solderless if you have a socketed ANTIC on your machine (most 400/800 and most XLÄ‚Ë€â„Ës) Remove your existing ANTIC and put it in the Position 1 socket on the AntiX PCB. Then put the second ANTIC in Position 2 on the AntiX PCB. Next, put the AntiX PCB in the empty ANTIC socket. Finally, connect a switch (SPDT) to the three-pin connector on the Antix PCB. Naturally, on XEs and other machines without socketed ANTIC you will need to desolder the ANTIC and solder in a socket. For 400/800 machines a ribbon extension cable and adapter are required. Note: The 3 pins meant to connect the SPDT Switch to has one pin labeled +5V, and one GND. Those are the signal levels present on those pins ! So DO NOT connect +5V or GND to these pins, this is not required, AntiX getÄ‚Ë€â„Ës itÄ‚Ë€â„Ës power from the ANTIC socket. ONLY connect the outer two pins of a SPDT switch to these pins, the center pin of the header must be connected to the center pin of the switch. Source: AtariAge http://atariage.com/forums/topic/281761-introducing-antix-the-antic-switch/
References
Copyright holder